Following these below steps to set up a page for your users to login via their social network accounts:
Step 1: Go to Pages → Add new. Create a new page named “Social connect”.
Paste the shortcode [social_connect_page] to the content section. In template box, keep the “Default Template”.

Step 2: Go to Engine Settings → Social Login → General setting: Paste the link of the “Social connect” page you’ve just created above.
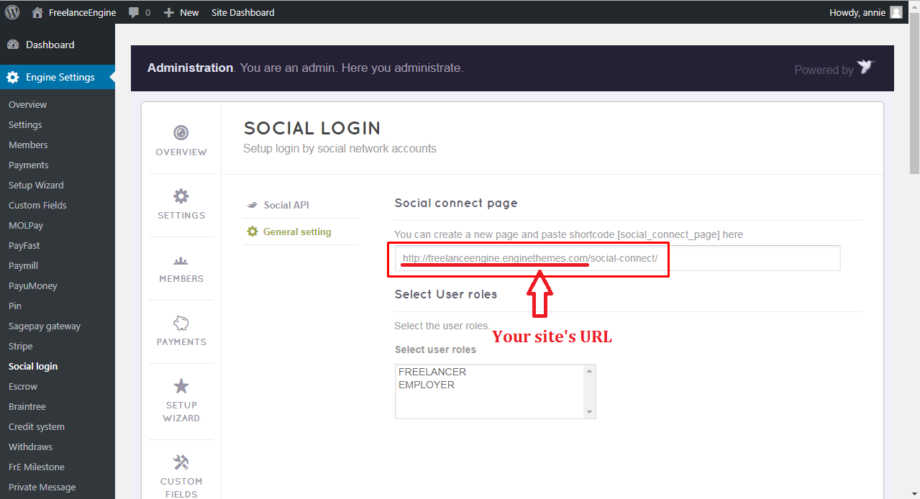
For example: https://freelanceengine.enginethemes.com/soccial-connect/
Step 3: Choose both FREELANCER and EMPLOYER in Select user roles section.

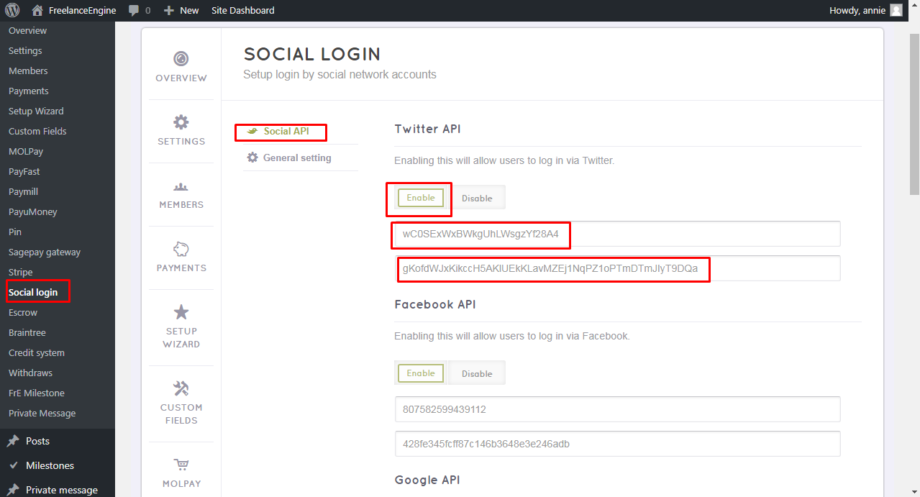
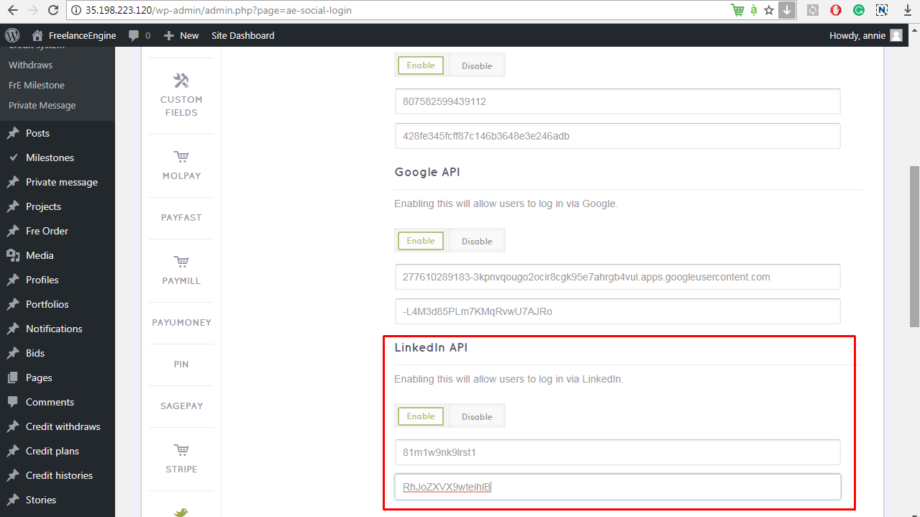
Step 4: Go to Engine settings→ Social login→ Social API: Click Enable & Insert the API in the Config Social Login API section.
Get the APIs key
1. Login to Facebook.
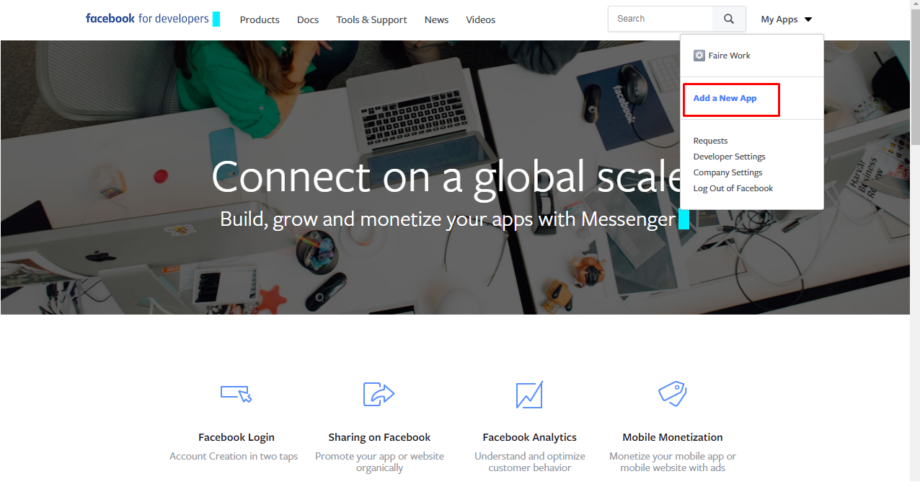
2. Go to Facebook Developer application to upgrade your personal account to a Facebook Developer account. If you have already had a Developer account, please skip this step.
3. After that, you will be prompted to a screen where you can create a new Facebook app. Please click “Add a New App” button.
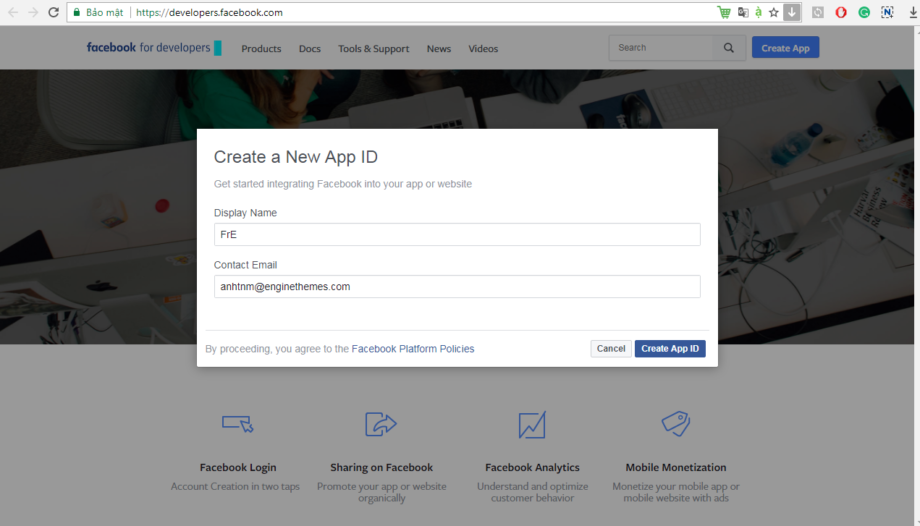
4. Fill all required information, including Display Name & Contact Email. Then, hit “Create App ID” button to create a new app ID. Please note that your app will have a unique app ID. You will use this ID whenever you use one of Facebook’s SDKs or SDKs or Open Graph tags for sharing .
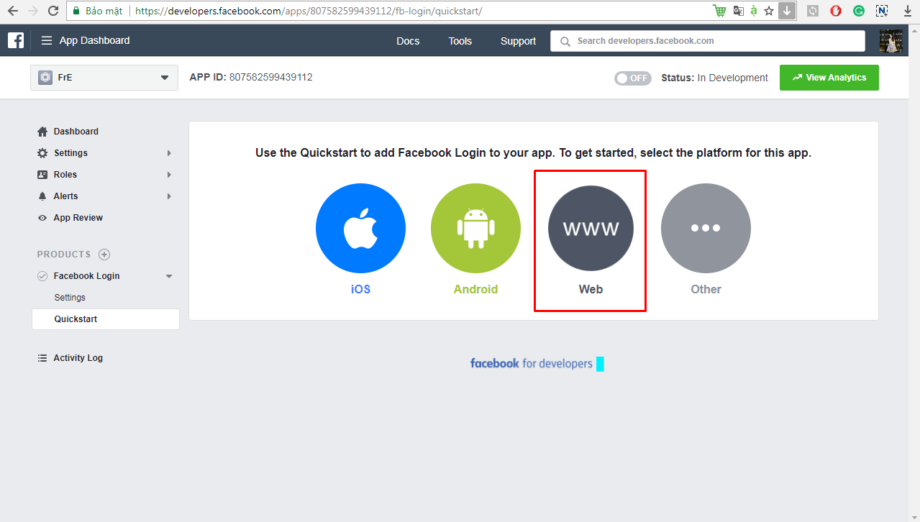
5. At that time, you will be redirected to the product setup page, please click “Set Up” button in the Facebook Login section.

6. On the next screen, you will be given choice a platform among 4 options. Make sure you select Web.
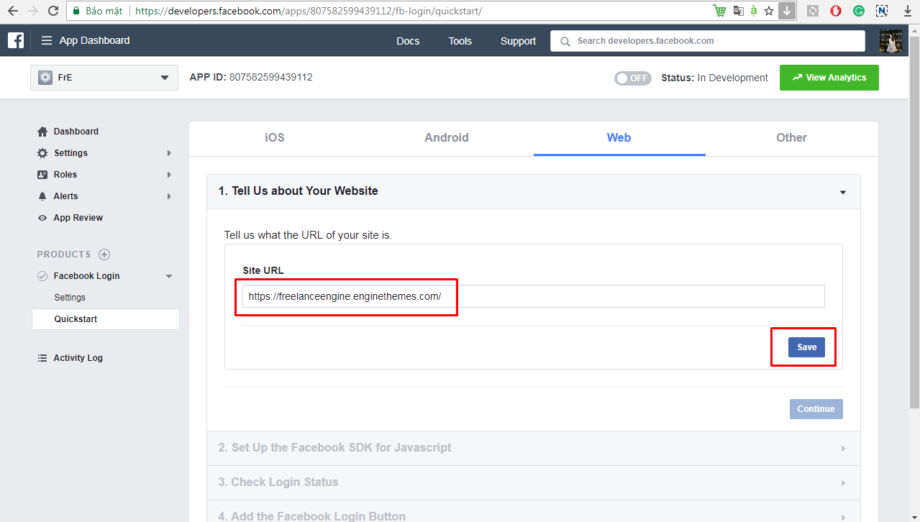
7. After that, you need to input your Site URL and click the “Save” button. Please note that this URL includes http:// or https://.
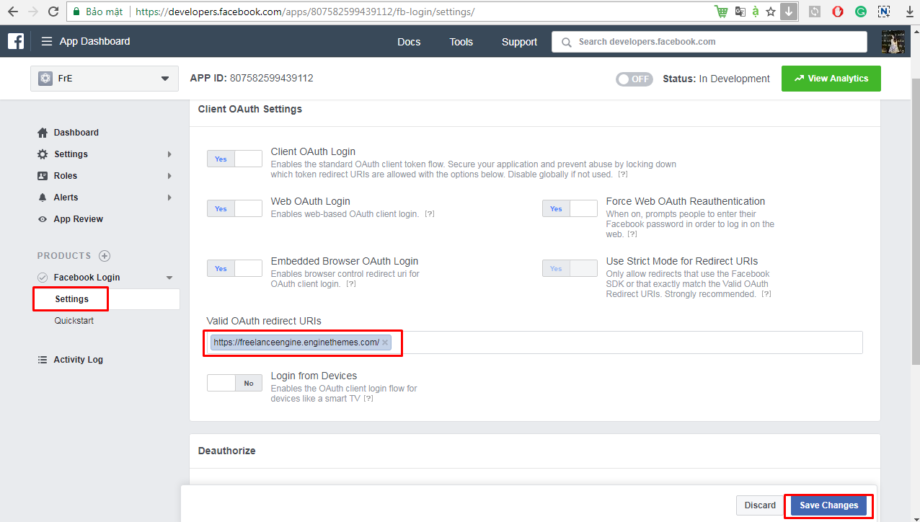
8. Use the same URL you entered in the Site URL field above, and paste it in the Valid OAuth redirect URIs option (Products → Facebook Login → Settings). Don’t forget to click “Save Changes” button.
9. Navigate to Settings section from the left sidebar to fill in your contact information. Otherwise, your app could not be accessed.

Enter your website domain in the App Domains field.
- Next, you should upload the app icon and select category.
- Hit “Save Changes” button.
10. In the App Reviews section, click the button to Yes for make your app be published.
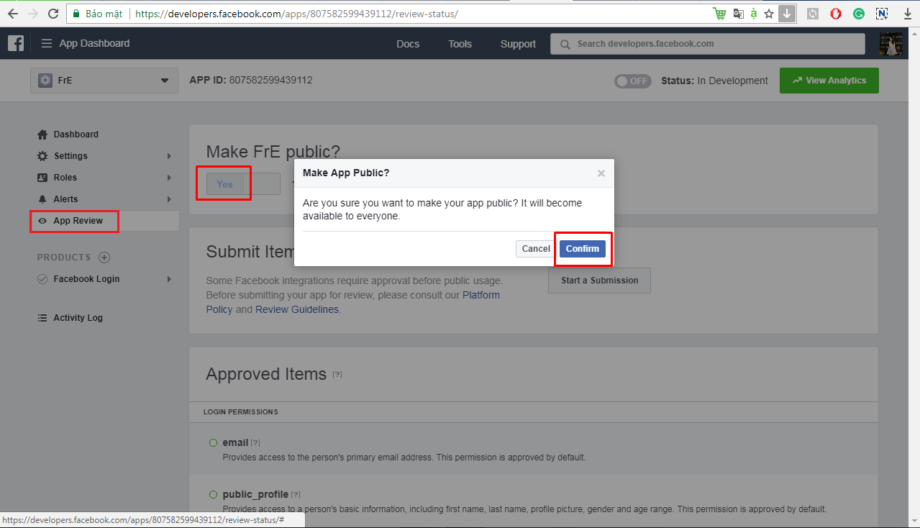
If you see the green dot – that means your app is online. Now your customers could log in using Facebook login.

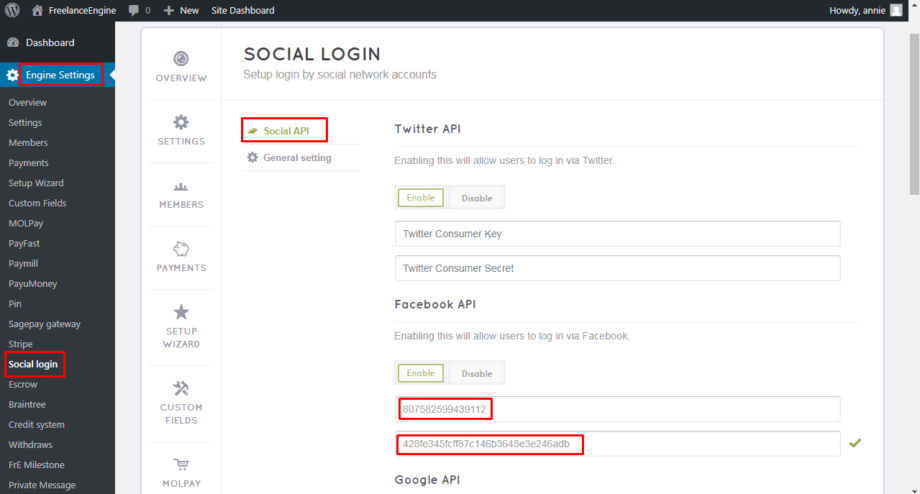
11. Finally, go to your app’s dashboard and copy your Facebook API data and add it in Engine settings→ Social login→ Social API
Then paste the App ID for Facebook key, also paste the App secret for Facebook secret key.
That’s finished!
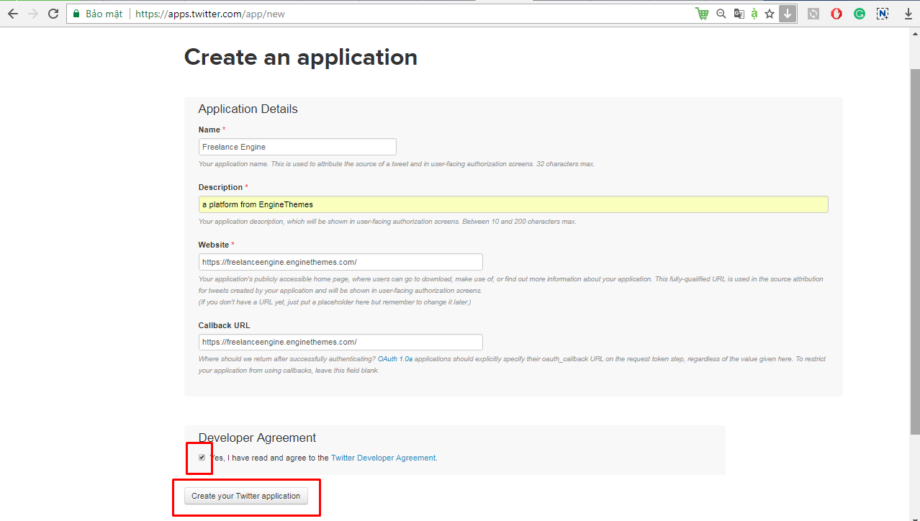
1. Similar to Facebook, you also need to create new apps on Twitter at https://apps.twitter.com/ .
2. Fill in all required information on the Create an application form. Then click the “Create your Twitter application” button to submit.
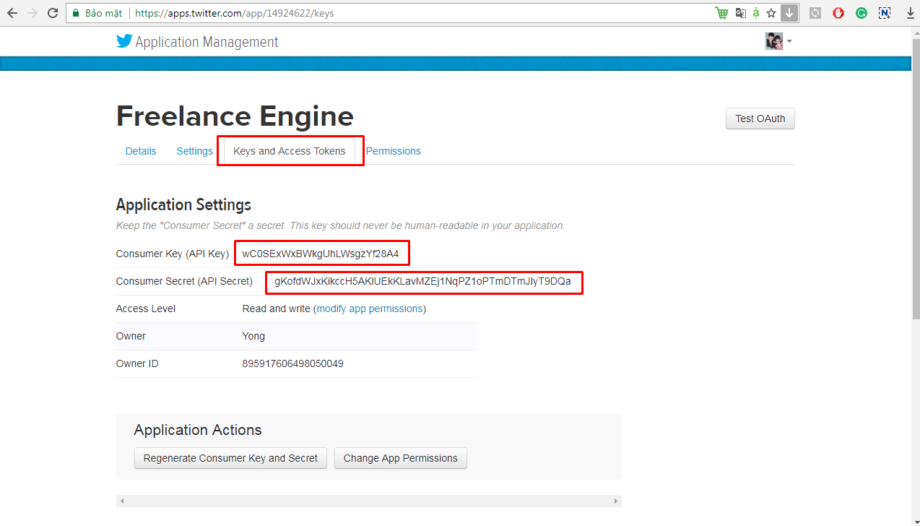
3. Get Consumer key (for Twitter key) and Consumer secret (for Twitter secret) in Keys and Access Tokens tab. Add Consumer key and Consumer secret to your site. It locates at Engine settings→ Social login→ Social API
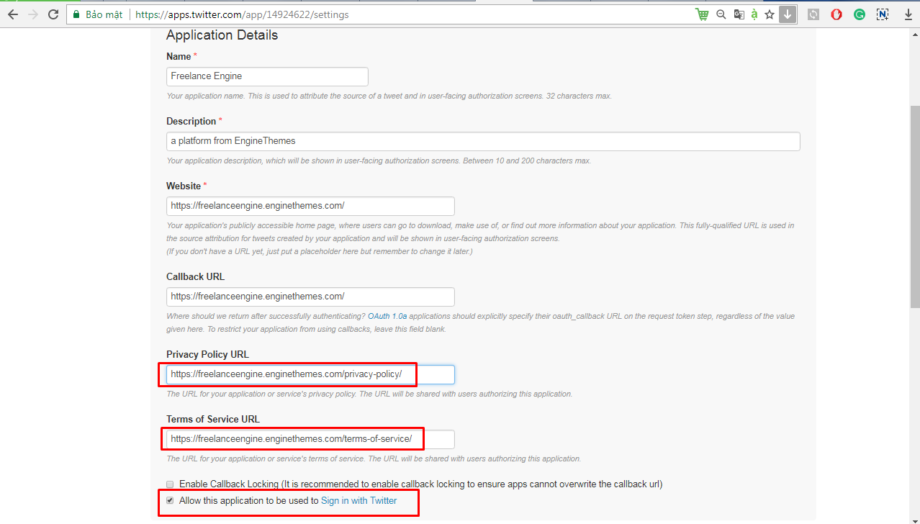
4. In Home → My applications → Settings page, please tick on the “Allow this application to be used to Sign in with Twitter” option to finish the registration processing. Please note, you should check the “callback URL” field if it is your domain URL. Also, you must input your site Privacy Policy URL & Terms of Services URL.
5. Go to Permissions tab to set up what type of access your application need.
- By default, your Twitter app should have Read and Write access. If this is not the case, modify your app to ensure that you have Read and Write access to give the application permission to post on your behalf.
- Besides, you can tick on the “Request email addresses from users” option under the Additional Permissions to get user’s email addresses whenever they log into your site via their Twitter account.
Now, your user can log into your site via Twitter account.
Google Plus
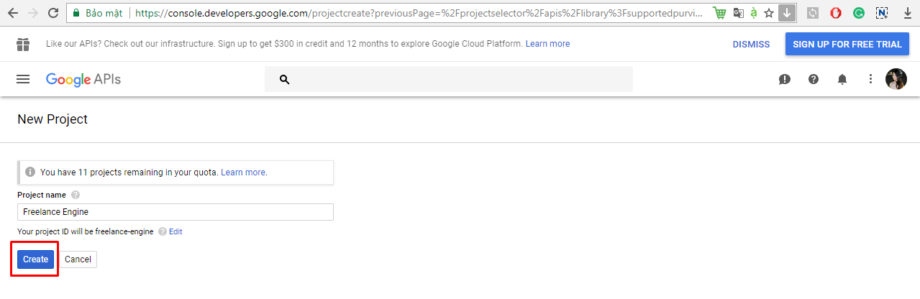
1. Go to the Google Developers Console to create a project.
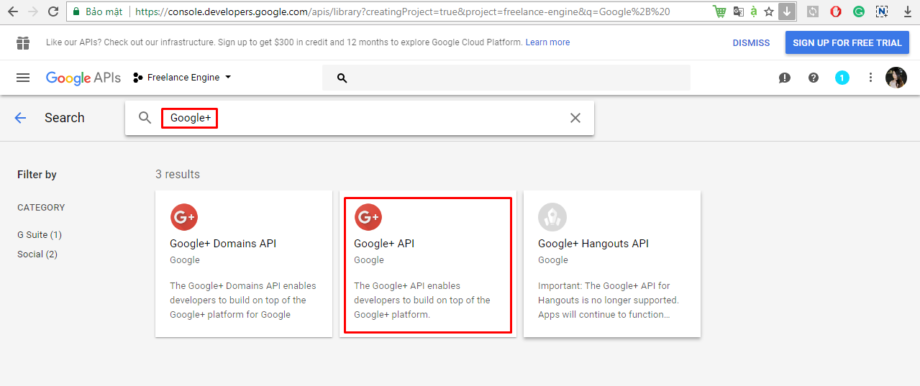
2. After that, you will be redirected to the Library page where you must enable the Google+ API service.
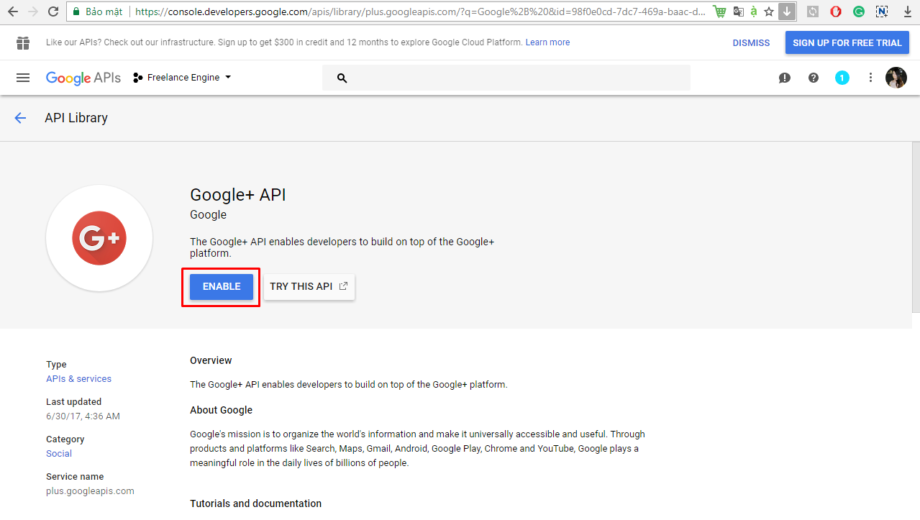
3. Then, check your Google+ API status to make sure it is enabled.

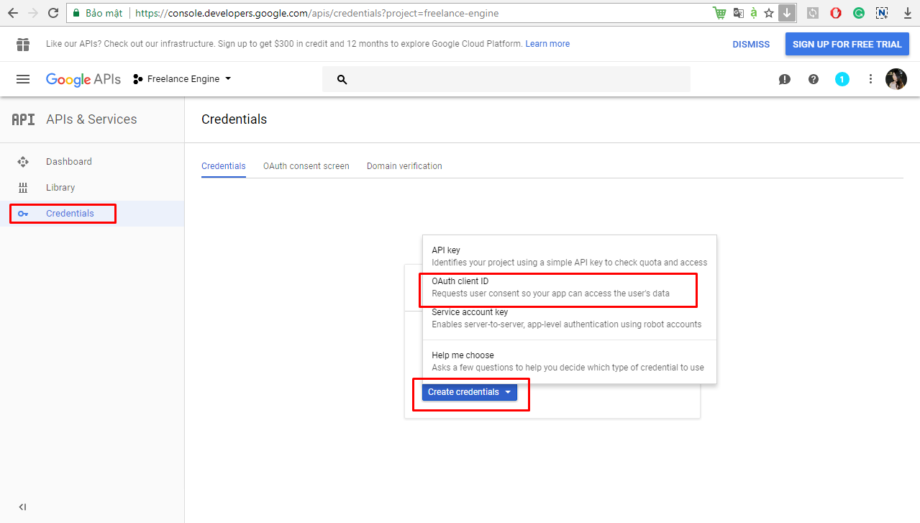
4. Select Credentials tab in the left sidebar.
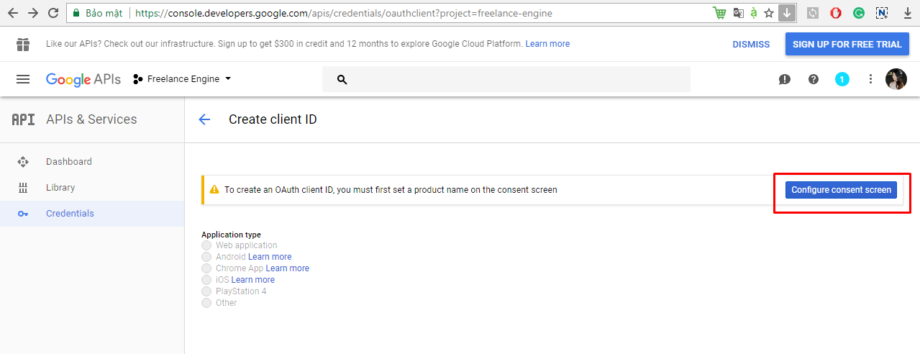
5. In the Credentials tab, click the “Create credentials” drop-down list, and choose the QAuth client ID.
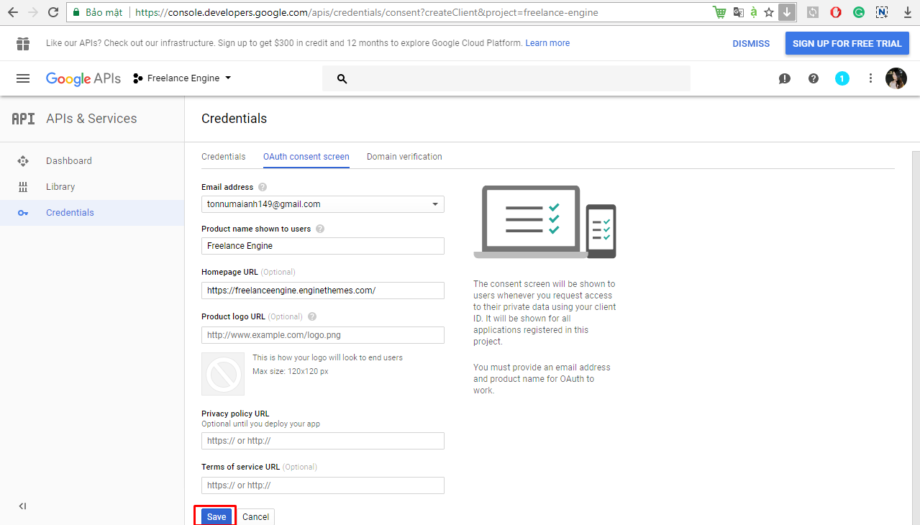
6 Before selecting the application type, you must set your product name in advance by click on the “Configure consent screen” button.
In this step, you must fill all required fields as instructed, then click on the ” Save” button to submit.
7. On the next screen, you must select Web application as your application type. Then, click on the “Create” button.
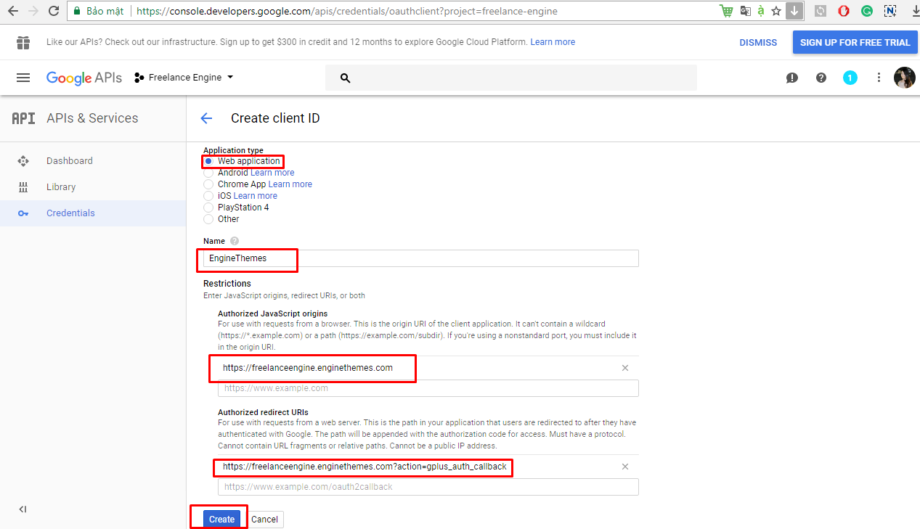
Note: In Authorized redirect URIs section, make sure you have “?action=gplus_auth_callback” after your origin URI.
8. After that, you copy the Client ID (for Google key), Client secret (for Google Secret key) from the QAuth client dialog box to your site. It locates at Engine settings→ Social login→ Social API.


Now your users can access your website via Google Plus.
LinkedIn API
JobEngine & FreelanceEngine theme support importing user information from LinkedIn to your job seekers’ profile. You only need to register one LinkedIn API Key to set the system working.
Please follow the steps below to get LinkedIn API:
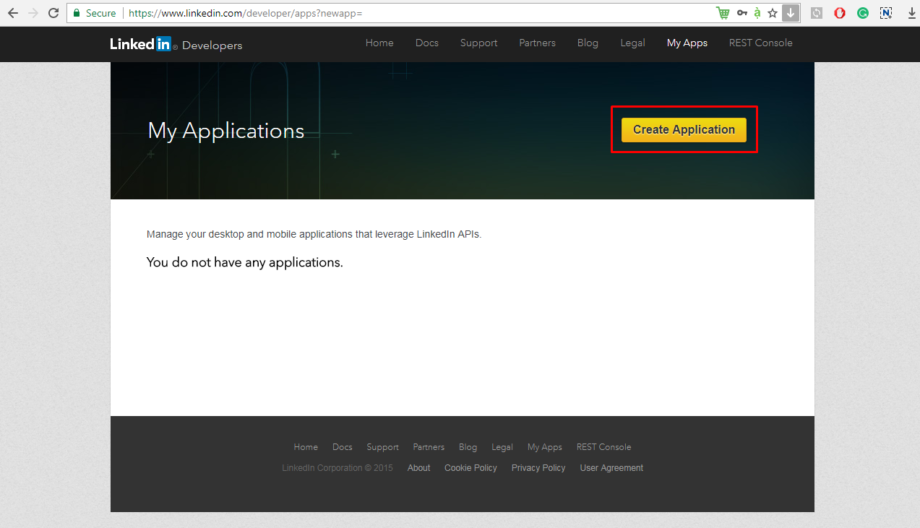
1. Create a LinkedIn API application at https://www.linkedin.com/secure/developer?newapp= .
2. Click the “ Create Application” button.
3. Fill in required fields in the Create a New Application form as descriptions below:
- Company Name: Specify your company name.
- Name: Specify the name of your app (You can type whatever name you wish , but it’s recommended to enter your website or company name in this field).
- Description: Enter short description of your company/website.
- Application Logo URL: https URL of the logo of your company/website, in PNG or JPG format (preferably 80×80 pixels).
- Application Use: Select Other.
- Website URL: Go to your website homepage, copy this URL and paste it in this option. Please make sure that this URL includes http:// or https:// (for example: http://mywebsite.com orhttp://www.mywebsite.com).
- Business Email: Specify email address.
- Business Phone: Specify your contact number.
- I have read and agree to the LinkedIn API Terms of Use: Tick on the checkbox.
Then, click the “ Submit” button to complete.

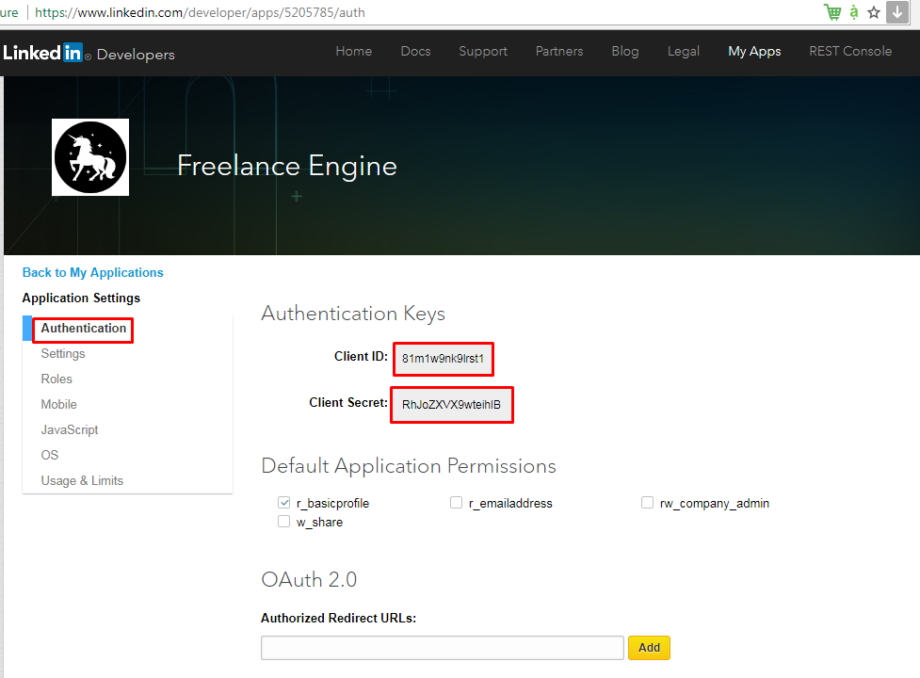
4. Make sure r_basicprofile , r_emailaddress are selected in Default Application Permissions section. Fill the blanks. Next, click “Update” button on LinkedIn app page.
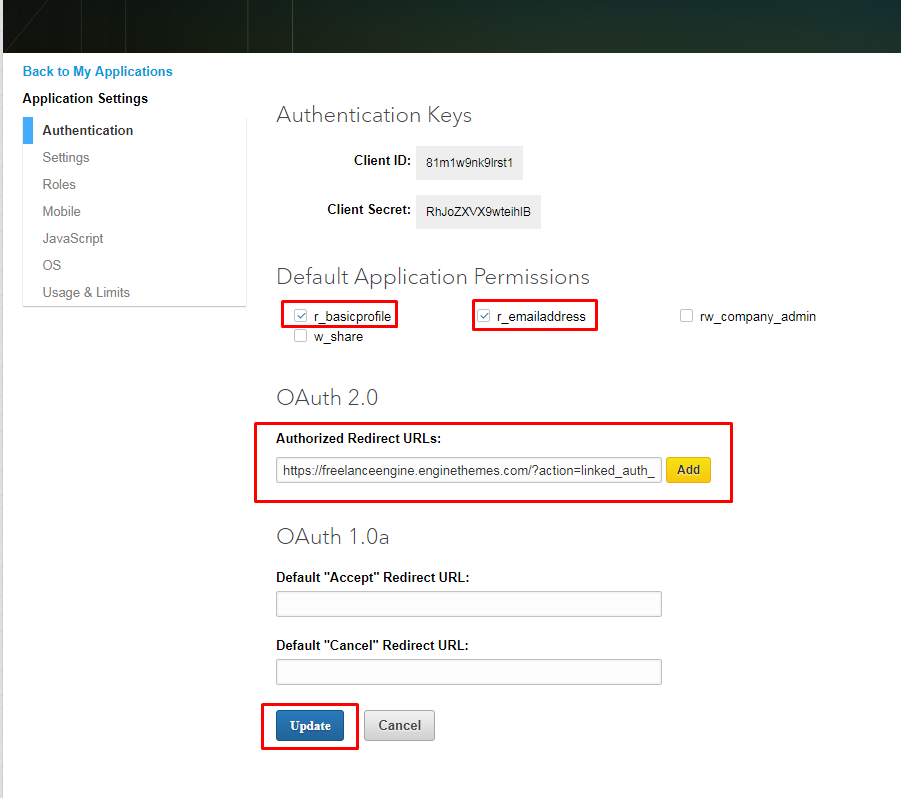
***Notice: In the Authorized redirect URIs field, you must enter this default URL:https://yourdomain.com/?action=linked_auth_callback. EngineThemes will enter http://enginethemes.com/?action=linked_auth_callback for example.
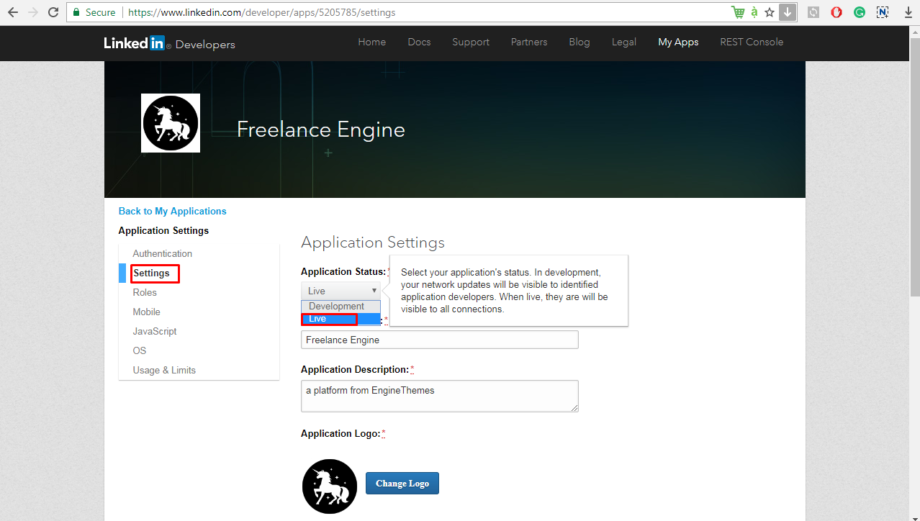
5. Navigate to Settings section from the left sidebar. Set Application Status to Live and click “Update” button.
6. Move to JavaScript section from the left sidebar. Enter exactly the same URL as in Website URL option in step 3 above, in the Valid SDK Domains option and click “Add” button.
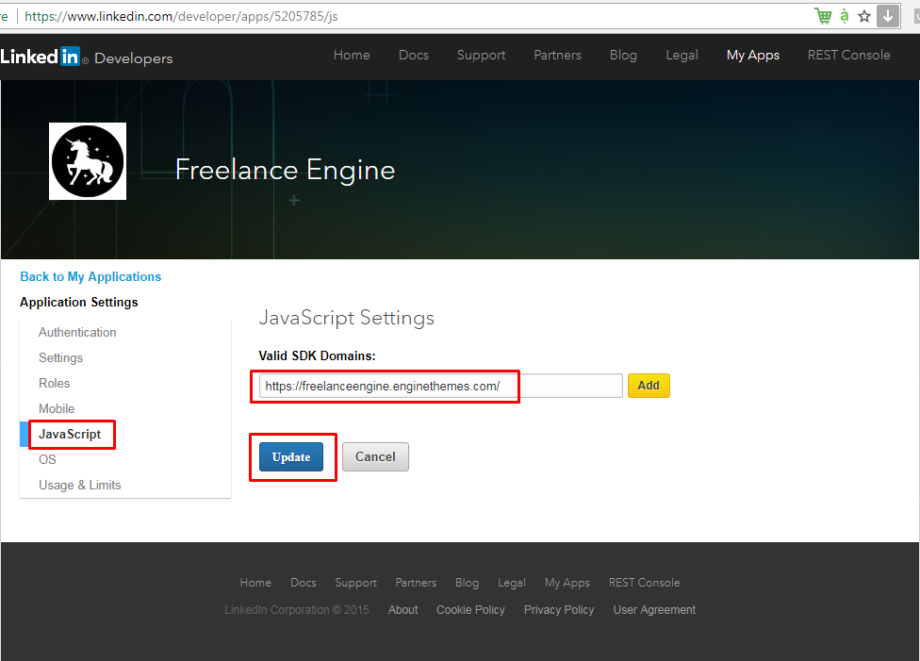
7. After the page refresh, you should see the domain (you have just saved) below the option. Click “ Update” button.
8. Copy Client ID and Client Secret to your site (Engine Settings → Settings → Socials).
That’s finished.
Leave A Comment?
You must be logged in to post a comment.